
How to Install an In-Ground Trampoline
Looking for directions on how to install an in ground trampoline? If your trampoline has arrived and you are ready to install it, then you can use this guide to help you along the way.
Remember that this document is only meant to serve as a guide, and not to fully replace the manual that you should have received along with an in ground trampoline.
Before you start assembling and installing the in-ground trampoline kit, un-package everything and open up the manual to make sure you have all the parts required. Check off everything that you need and get everything organized in the yard so that it is readily available. Also keep in mind that it's a good idea to do some form of water mitigation through drainage.
Installing an in-ground trampoline step-by-step:
- Step One: Set Up the Frame and Mark the Dig Area
- Step Two: Digging the Hole
- Step Three: Finish the Frame and place it in the hole
- Step Four: Attach the Springs
- Step Five: Attach the Pads
- Step Six: Have Fun!
- FAQ
Step One: Set Up the Frame and Mark the Dig Area
Start by assembling the frame. You do not need to assemble it completely, you just need to get it to where you are able to mark the dig area.
Begin assembling it in the area you plan to dig the hole. Make sure that the holes for the springs are pointing upwards when you are doing so. You can do this with one person, but it will go by faster with two.
After the frame is set up, find a way to mark the area that you want to start digging (can use spray paint). You may want to add about 2-5 inches to the outline of the frame so that it will be easier to place it in the hole. Remember that you can backfill this.
Once you have your frame built and an area marked off, you can begin taking off some of the turf so that you can use it to backfill later. You don't need to save all of the turf, just enough to cover your tracks.
Step Two: Digging the Hole
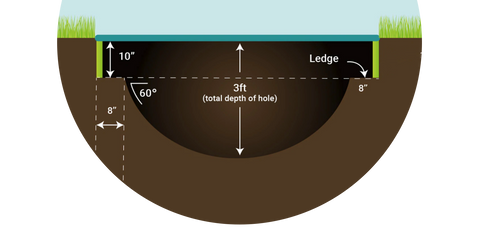
Once you have enough turf saved, you can begin going all out and digging the hole. The first dig will involve going down to the shelf level. Consult your manual for the required depth for the ledge, but you'll want to use a measuring device to complete each dig. Dig to this depth for the entire hole to begin with (not just the frame) and make sure you measure all sides at multiple points every few feet or so.
After you've dug the first hole, mark out the area for the next hole. Again, consult the sizing requirements for shelf length requirements. It's safe to add an inch or two as you will be backfilling this area. Then begin to dig the second hole, which will serve as the bounce area, which is also called the bowl area.
The sides of the hole do not have to go straight down. They should be rather steep, but feel free to allow them to come down at a good angle. This minimizes the amount of soil you need to take out.
Note: The following are diagrams for hole dimensions for each brand Trampolines.com carries.
TDU In Ground Trampoline Dimensions

Capital Play In Ground Trampoline Dimensions
Avyna Retaining Wall for installing a Regular Trampoline at Ground Level (Dimensions)

Rectangle Trampoline Hole Dimensions
| Brand | Outer/Frame Hole Dimensions | Outer/Frame Hole Depth | Inner Hole Dimensions | Inner Hole Dept |
|---|---|---|---|---|
| Avyna | 10x17' | 9" | 8'4"x15'4" | 36" |
| TDU / Capital Play | 10x14' | 10" | 8'8"x12'8" |
36" |
Round Trampoline Hole Dimensions
| Brand | Outer/Frame Hole Dimensions | Outer/Frame Hole Depth | Inner Hole Dimensions | Inner Hole Depth |
|---|---|---|---|---|
| Avyna | 12' | 9" | 10'8" | 36" |
| Avyna | 14' | 9" | 12'8" | 36" |
| TDU (Retaining Wall) | 14' | 36" (only one hole made) | – | – |
Step Three: Finish the Frame and place it in the hole
After you've dug your hole, it's time to finish assembling the frame. To do this, you will need to attach the retaining walls using a screwdriver.
The retaining walls should have holes for the screws already in place, so all you need to do is line them up and start screwing them on. It's best to start with the top holes first, and then move on to the bottom holes to complete the attachment. After you've done this, set the frame inside the holee and place it on the shelf to make sure it fits correctly. If it fits correctly you can continue, otherwise you'll need to make adjustments.
Once you know the frame is going to fit, you can then lay the membrane down. Once you've done that, lower the frame into the hole and move on to the next step
Step Four: Attach the Springs
Once the frame is in the hole you can start to attach the mat with the springs. If you are installing a rectangle trampoline, then you will want to start with the four corners and the middle of the sides, and then move on from there. If you work in opposites with someone, it will make it easier as the tension will be even.
Once you get the springs on, you'll notice that the frame has moved in quite a bit. At this point, you'll want to do a little test run with your trampoline and jump up and down on the mat to make sure everything is secure.
If everything feels good, you can start to backfill the space between the outer side of the retaining wall and the ground. Try not to get any soil inside the bowl area. When you're ready, pack it down nice and tight and re turf it with some of the turf you saved.
Step Five: Attach the Pads
The final part of assembly is to get on all of the pads. It's best to get all of the toggles onto the pad first, with the round ball facing the inside of the pad. When they're attached, flip the pad over onto the trampoline and begin to attach it by looping the toggles onto the frame. Your manual should provide clear instructions on how to do this.
Step Six: Have Fun!
That's it! You've now completed the DIY assembly and are ready to get jumping. Give it a whirl right away and see if everything seems and feels ok. You're now ready for good old fashioned fun for years to come!
FAQ
Can I put a regular trampoline in the ground?
It is possible to put an above ground trampoline in the ground by using a retaining wall that you can fit to your existing trampoline. When purchasing a retaining wall for your normal trampoline, make sure that the sizes match up. The size of the retaining wall should match the size of the trampoline frame - not the jumping area.
The difference in the process for putting a regular trampoline in the ground, as opposed to using an in ground trampoline, is that you will only dig one hole 3 feet deep, instead of digging two holes (one of which is for creating an additional hole for the shelf).
Of course you can try to DIY and use wood, metal, or bricks for a retaining wall, but many times these self made options are susceptible to problems like rotting, insects, or improper construction.
Can you put a trampoline on artificial grass?
Installing in-ground trampolines on turf is possible and many times even favorable. This is because the synthetic grass will always be green, lush, and visually appealing. It is a common trend and is growing in popularity.
Can I put a trampoline in the front yard?
Although there aren't any laws against installing a trampoline in the front yard, your insurance company may not insure your home if you do so as it can be seen as a liability. Additionally if you live in a sub development or are a part of an association, it may be against the rules. Additionally, a trampoline in the front yard may look like a public park, and there is a possibility that random strangers would take to jumping on it.
Can I put a trampoline on gravel, concrete, or in my garage?
If you are looking to install a trampoline, it's best not to put it on top of gravel or concrete for safety reasons. There is a risk that a child, adult, or even a pet will fall off and seriously injure themselves on the hard ground. That being said, there are ways to pad the area and childproof it to make it safe if you absolutely want to install a trampoline in your garage or on an area where there is concrete.
Can I install a trampoline on uneven ground?
It is possible to install a trampoline on uneven ground, or a slope, by digging out a trench to make the ground flat. The digging for installing a trampoline on a slope is much more intense, and you will have to make a plethora of different measurements to make it happen.
Can I use a trampoline in the winter?
If you live in an area that is susceptible to extreme cold and large amounts of snow, it is best to either place a cover on your in ground trampoline, or disassemble your above ground trampoline and store it during the winter. Snow and icicles can build up on the mat, and it could possibly damage reduce the trampoline mat's life-span.